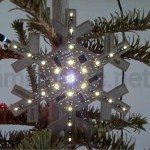
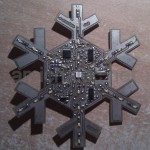
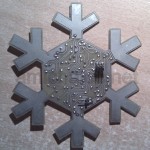
Late in December 2011 I almost bet that I am able to design & build myself a blinking serpent of rainbow lights for Christmas tree. I did not want to spend much time on creating cables and lights themselves but I imagined a star shaped thing full of LED lights that would gently shine or glimmer in many ways. Dozen of work-hours and couple weeks later my new DIY project has seen the light of day; on nearly dry and dead tree I hung the electronic snowflake, a tradition breaking techno-gadget.
The concept
This idea fix got me completely for last few weeks. Initially I was thinking of LED lights driver but I lost my attention due to mechanical problems – line of LEDs requires more work on cables than driver itself. I shifted my effort towards more centralize light. I imagined star on top of the tree that finally become snowflake, more religion agnostic.
I had to face several design aspects:
- I had to made up PCB on my own (complex shape of cut makes professionally made PCB a bit expensive),
- I wanted to drive two dozens of LEDs with far less IC pins available,
- Complicated wire routing implied 2-sided PCB and apply “ironing technique” for both PCB sides first time too, and
- I decided to used MCU with at least 8kB flash and chosen Atmega8 to open up possibilities like:
- using developer-friendly code more than optimization tricks with assembly insertions
- to be able to play with RTOS later on, and
- replace Atemga8 with Atmega88 in case I would like to start exploring hardware debugging with brand new toy JTAGICEmkII imported from Hong Kong.
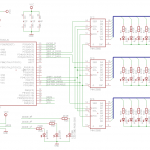
Concept was quite simple: use Atmega8 MCU that drives three 8-bit shift registers with buffers (74hc595) to get 24 lights. I made up radial shape with 6 arms, 4 LEDs each. I already had some experience with phase modulation (PWM) so I decided to use this technique to get different brightness for each LED separately. My first concern was if I can use 74hc595 at all – it allows only 70mA total current for all 8 output lines. Old fashion LED would require 10-20mA for full brightness, I was surprised by modern white LEDs that require 5mA to get maximum brightness that allowed me to stick to CMOS shift registers. LED powered by 5mA current was easily visible in sun light. High brightness was considerably good even with 3mA current. I have chosen ~4mA current to have margin for 74hc595 (32mA in total), high brightness and low power consumption. For this current and ~3.0V white LED voltage drop I used 470R resistors. For center RGB diode that was even brighter I used even lower current with ~1k resistors. Total maximum power source current including 4mA for MCU in active mode was a little above 100mA, while in practice with estimated 20% of lights on, it should be OK to use battery source.
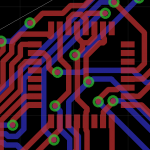
To simplify wiring I made some clock and reset lines shared across all registers. Even though I could not fit into single side PCB. I was disappointed this time by free version on Eagle PCB that allows only 80x100mm layout, not enough to draw reasonable big snowflake shape (I had to design only central part and manually paint the “arms” of snowflakes holding diodes). I spent couple hours learning Eagle, to force it to create PCB full of hundreds wires, unsuccessfully. After I gave up on auto-router and DRC settings I had to switch to 2-sided design to fit into the snowflake size of 120x120mm.
Board design
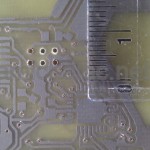
PCB design was based on idea of naked circuit – all SMT elements on the same side as LED lights. To get better effect of winter time I decided to chemically cover board mosaic of wires with chemical tinning process. Effect was astonishing, silver shiny surface not only ease soldering and protects from oxidation, but also gave more frozen-cold look of snowflake shaped board.
It was first time I made up two sided PBC. Most tricky part to align vias with sub-millimeter resolution. Drilling 3 reference points for print mask worked well: I could manually drill 0.5mm holes in 1mm diameter via fields. Yet I have failed in two aspects: for manual soldering vias were too tiny, I had to make them much bigger in diameter than for factory metalization process. The other problem was ISP 6-pin connector assembly point. Default pads were also narrow comparing to drill diameter, some pads has been torn off by mini-drill torque messing up PCB. This pushed me into another couple hours long PCB design session. It was longer than I expected since auto router could not fit with thick vias and thick wires; I made up manually nearly half of routing moving around virtually every connection. Since vias were designed to soldering (in contrast to metalization done by the factory) I had to move vias out of chips placements that implied even more complex design.
At this point I skipped my initial considerations on board-mounted battery powering; complex wiring of both PCB sides make it impossible and I still wanted to keep board minimalistic. This way I decided to have only 2-pin power connector. I have also postponed idea of USB connector (based on FT232) to open platform for programming light effects using PC software. The idea remains good for future exploration.
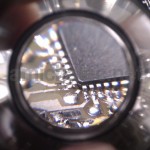
Second version of board was good enough to easily solder vias and ISP programming connector. Firs I needed however cut off right shape and polish edges which took another half an hour. Then I could quickly assembly all SMT elements finalizing this part within an hour or so. The only problem with bootstrapping new PCB was that programmer could not see the MCU. Inspecting pins with zoom lens I got suspected pin that was probably floating. After resoldering the MCU responded to ISP programmer confirming my suspicion.
Firmware
First step was to proof design correctness switching on and off lights one by one. This was most thrilling moment of work: this time I did not prototype system on breadboard and any mistake would turn me back to the concept phase of project. I was happy it worked like a charm.
Debugging
With strong Eclipse background my tool of choice was only one – CDT environment with AVR plugin and WinAVR toolchain. Working on dice toy I did not need debugger. Now I was facing more powerful MCU and I felt I need some more tools before jumping into dev phase. Neither Atmega8 supports in-system debugging nor I had hardware debugger (not at the time, Chinese JTAGICE-mkII has been delivered to me couple days ago) so I was looking for simulators. To my disappointment this is weak part of Eclipse platform. Working solution was to combine Eclipse powerful code editor with AVR Studio in simulator mode. Since both uses different project organization I stick to Eclipse which, for simulation purpose, produces ELF file. I spent some time learning how to make this working. AVR Studio 5 is not capable to correctly read ELF files, neither stubs nor dwarf-2 format. Rolling back to AVR Studio 4 I found also some misbehavior, e.g. missing path to GCC sources. I noticed that sometimes switching compilation flags and incremental build interferes with that goofy message; removing Debug directory and “build all” with dwarf-2 debug info type helped. Least problems I noticed with version 4.16 SP1 that works with recent stable version of WinAVR-20100110. Also Eclipse itself has some quirks; clean and full build is ignored if at least one source file is touched.
Embedded C++ pitfallls
The hardware with handful flash amount gave me the margin to consider more space consuming solutions than assembler or ANSI C coding, especially after years with higher abstraction software systems. Being AVR-GCC friend already, the natural choice was C++ based on this environment. First prototype came quick with some great hints from avrfreeks forum I could compile and run simple C++ code that could seriously simplify API for snowflake LEDs management (e.g. object-oriented access to particular lights, wrapping up effects into decorable objects etc). All this stuff coming from my high-level programming experience. Quick successful play with C++ ended abruptly when I came to debugging. Using Eclipse+AVR Studio mechanism During simulation session I could not introspect class object in watch window. Most variables were “not in scope” despite the code was compiled with optimization completely switched off. I was upset since my observation was reflected in this thread of discussion. Possibly AVR Studio 5 dealt this limitation, yet editing capabilities are far behind Eclipse. Conclusion is that I stick to Eclipse CDT+AVR and AVR Studio 4.16 and live with regular C coding.
Firmware design
Source code is organized in layers to encapsulate concepts. Most basic level is abstraction of lights that can lit with different brightness and supports sequences of brightness changing over time (called effect). On top of there is set of predefined effects like “rainbow”, “star pulse” or “shining” effects. Topmost layer is infinite loop of choosing and replaying predefined effects to entertain observer.
Having bottom layer, middle and top layers are quite lightweight and self descriptive on source code level so that I skipped dissertation on these areas.
Bottom layer is most complex part responsible for implementing following mechanisms:
- managing shift registers to pushing out data in serial way
- brightness control based on phase wave modulation (PWM) for both white LEDs driven through shift registers and RGB light directly connected to microcontroller
- exposing friendly API to hide complexity and implementation details, including simple control of particular lights (e.g. “set brightness of light no 10 to 4”) and complex sequence of brightness change to gain visual effects.
Brightness control with PWM modulation relies on interruption generated by Timer0 overflow. Challenge was that interruptions had to be high frequent. PWM frequency should be high enough to make blinking invisible to human eye. On the other hand PWM has must reflect as many possible cycle duties as brightness levels expected. To switch on and off single light PWM modulated, it means that interruption frequency is multiplication of PWM frequency and brightness levels. I assumed initially 100Hz PWM with 100 brightness level (expressed as percentage). That led to 10kHz interruption call frequency. I had to also take into account that interruption handler cannot take all time of interruption interval otherwise MCU will not be capable of processing other tasks like effects replay. My first assumptions were quickly verified by reality: first implementation that each time calculated PORTC bytes and pushed them to shift registers took nearly 150us completely locking MCU that has interrupts every 100us.
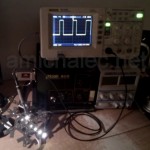
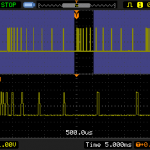
During experiments phase I noticed that smaller number of brightness level, like 16, is enough to get fade in and fade out effects and to reduce number of machine instructions per PWM cycle. Also the interruption events appear with slowing down pace within single PWM cycle – this is to address LED non-linearity: the closer to optimal current value, the less LED brightness is sensitive to current change. Subsequent interruptions appear when counter counts 1, 3, 6, 10, 18 … 224 and 255 timer ticks (see oscilloscope screenshot to visualize). In that case time of lightning on 1st level brightness is 1 tick, on 2nd is 4 (3+1), on 3rd is 10 (6+3+1) and the brightest 15th level remains for 1332 ticks (255+244+…+3+1). With prescaler f/256 that PWM cycle, thus refreshing rate, could be about 47Hz (16MHz / 256 / 1332), acceptable for human eye. Could be since shortest lightning time of 1 timer tick is f/256 = 62.5kHz so 16us to light LED on as switch if off, interruption handler took nearly 150us as you remember.
Slowing down timer was not an option: refresh frequency would be noticeable, I needed to optimize shift registers handling.
New idea was to cache all possible states of PORTC for full PWM cycle. The price for shorter time was twofold: longer time to call lowest layer API methods (they need to refresh cache now) and much more memory consumed: 120 bytes for 15 levels of non-zero brightness and for every brightness level 8 bytes of single PORTC state to shift into 8-bit registers). Since only 3 bits of each byte are used (segments A, B and C in schematic) it could be quickly compressed to 6-bit packs consuming only 60 bytes. For maximum speed however I keep memory completely flat (Atmega8 has 1024 bytes of RAM so I did not bother anyway). This allowed me to use PWM cache for RGB light too (using another 3 bits of PORTC).
Timing results were optimistic – original light refresh handler time has been shortened from 150us to 19us on average. The extra payment on API level is 50us, however changes to brightness are far less frequent than reloading shift registers (e.g. fading in a light from 0 to 15 in 1 second means that for between one API call and another shift registers are reloaded nearly 47 times).
Despite the only 16us delay between 0th and 1st brightness levels system is stable even with little longer processing. This is because avg-gcc compiler by default disables interrupts for ISR. When second interruption occurs and first ISR call has not finished, only the interruption flag is set but ISR is not interrupted (which would cause stack overflow and stop MCU). When first ISR call finishes the ISR is immediately called again due to flag still being set. Since delay between next brightness steps is much longer, second ISR call can finish before third ISR call. Subsequent interruptions in single PWM cycle appear in longer and longer distances, so that main routine code can get some MCU time for processing.
Having brightness control in place, implementation of effects was relatively easy task. For every LED in separation, effect can be described in two ways.
First option is pre-calculated data structure that keeps list of pairs, light brightness (0..15) and time time to lit in milliseconds. Since for effect with complex or stochastic behavior that list would be very long (and consume lot of precious SRAM) the second option is to specify iterator function that will be called when light change is expected. Comparing both options, former is memory intensive, second in computational intensive; the choice is on client code (upper layers).
Effects execution is controlled by second 8-bit timer (Timer2) ticking every 10ms and checking all 25 lights (24 white and RGB) for registered effect to proceed. When current time to lit expires, new brightness is calculated, either from structure or iterator, and PWM cache (for Timer0) is updated. When effect is played to the end, LED is switched off. Effects can be chained is larger sequence, and in particular case they can be looped in infinitive effect. More details on behavior, see the source code “snowflake.h” header file.
Next steps
With current code base I would add some more visual effects to hit flash memory barrier (now only 3/4 is used). However I have on my mind some other DIY ideas that are, comparing to coding new effects, far more exciting.
With 8kB of flash memory and 1kB SRAM, this board Atmega8 is also good candidate for playing with real-time operating systems for embedded devices like FreeRTOS or FemtOS. If time and excitement permits I am going to do some “hello world” on that device.
If you find this toy interesting leave a comment below or donate 😉



Great project, Thanks for sharing. I have one question, and that’s why didn’t you use SPI for deriving registers?
Good point! Main reason is that I am learning AVR piece by piece (it is my 2nd project) and have not played with SPI, except for using it as ISP. From the beginning I left SPI pins reserved to avoid problems with programming signals propagation to other peripherals; I have no best practice how to isolate it well (another 3 state buffer would be overkill). In this schematic one could use MOSI as serial-in and SCK as shift clock of 595, which would be propagated to shift registers as side effect. However if 595’s “buffer enable” pin is left to PD7, then its default state (high impedance) would lead to high state on “buffer enable” and cut off LEDs (desired effect).